Wednesday 30 June 2010

Lemony chicken wings

I saw this recipe a while back and I immediately knew I had to try it. I have been enjoying chicken wings quite a lot lately but have only ever made Spicy, honey glazed chicken wings and it felt like I needed a change of scenery, if you will.

And boy, the recipe for Lemony chicken wings was just the change of scenery that I needed. They were just delicious, just incredibly juicy and lemony!

YOU need to make these, YOU need to try them for yourself. They're really that good, I promise!


Lemony chicken wings
Serves 6
Adopted from Leila på landet

1 kg chicken wings
2 cloves garlic, grated
2,5 cm (1 inch) ginger, grated
2-3 lemongrass stalks
the zest from 2 lemons
3 tbsp tomato purée
3 tbsp Japanese soy sauce
2 tbsp light muscovado sugar
1 tbsp sesame seed oil

1. Place the grated garlic and ginger in a bowl.

2. Peel off the outer layers of the lemongrass, discard. Smash the lemongrass with the back of your knife. Finely chop the white part of the lemongrass and discard the more green and woody part. Add the chopped lemongrass to the bowl with ginger and garlic.

3. Add the rest of the ingredients and stir to mix.

4. Place the chicken wings in a large Ziploc bag or in a 5 litre plastic bag (you might want to put one bag into another bag to ensure that if the bag rips the marinade won't cause a mess). Pour the marinade into the bag with the chicken. Close the bag, pressing out as much air as you can while you close the bag. Massage the chicken wings to ensure each wing is coated with the marinade. Place in the fridge to marinade, preferably overnight.

5. Fire up the barbecue and grill the marinated chicken wings until done. To check if the wings are done, pierce the thickest part of the wing with a knife, if the juices run clear, then the wing is done. If the juice is a little bloody, keep grilling the wing until the juice runs clear. If you use small wings, like I did, you can place a double layer of aluminium foil on top of the grid/grate to keep the wings from falling onto the charcoal.

6. Serve as finger food at a party or as part of a BBQ-meal.

Enjoy!

Last day at work...

Today was my last day as an intern at the International Office at Telemark University College. It's been a blast working there, I have had wonderful colleagues and I have learnt so much about internationalisation and student exchanges. It's been so much fun.

As a farewell gift I was given this HUGE tomato plant! There's also some parsley, coriander/cilantro and rosemary in the pot. It's awesome and I am so thankful. Can't wait to try some new and exciting tomato dishes this summer.

Takk alle sammen på FA for en fantastisk tid sammen med dere, og takk for den fantastiske tomatplanten som jeg fikk av dere. Gleder meg til å lage masse spennende tomat retter i sommer. Håper vi ses igjen til høsten!

Quiz-gruppen, denne er for dere: hva er den laveste temperaturen som noen gang blitt målt på sydpolen?

Tuesday 29 June 2010

Mushroom, mozarella and spinach ravioli

I have been wanting to make ravioli for ages but have never gotten around to it, until now that is. I set out for the store yesterday to buy myself some ingredients for the filling. I had in my mind decided on making a mushroom, spinach and mascarpone filling, but they didn't carry mascarpone at the supermarket. What kind of a country do I live in wherea decent supermarket doesn't carry mascarpone? The answer is Norway, also known as "FSC" or "friend-stealing-country" to some of us!

Well, I had to rethink and decided on putting some shredded mozarella in the filling instead. What a wonderful idea, and I am sure it would have been so tasty had I invested in some proper mozarella instead of relying on the pre-shredded stuff we bought at the supermarket the other week.

I was also a little worried the process of making the actual ravioli would be extremely time consuming, but all went well, it didn't take long at all. Maybe all that dumpling making finally paid off?!

Anyway, to make a long story short, the ravioli were good, but could have been so much tastier had I used the ingredients I first intended to use. Ah well, next time I'm making ravioli I'm going to have a go at making homemade mascarpone. Wish me good luck, I think I'll need it!

The filling

Ravioli. I made some different shapes, mostly because my
ravioli folding skills need some work.

Yum, the finished product!

Mushroom, mozarella and spinach ravioli
Serves 1-2

pasta dough for 1 person
5 smallish button mushrooms, thinly sliced
125 g baby spinach leaves, roughly chopped
1 clove garlic, finely sliced
150-200 g mozarella (a little less than a ball)
salt and pepper

1. In a frying pan, melt some butter and add in the garlic and the spinach, allowing it to wilt. Remove and place on a plate to cool down.

2. Using the same pan, tip in the mushrooms and cook until most of the water has evaporated. Add in just a little butter and salt and pepper, stir. Remove and place on a plate to cool down.

3. Make the pasta dough while the vegetables cool down.

4. Using a pasta machine, roll the pasta dough to desired thickness.

5. Place the rolled dough on a clean and floured surface. Cut out squares.

6. Place the cooled vegetables in a mixing bowl, add the mozarella, stir to combine.

7. . Place 1 tsp of the filling in the centre of each pasta square.

8. Fold the square diagonally to create a triangle. Press down on the edges to ensure the filling doesn't leak out. Lift up the triangle and place it on your index finger with the base pointing towards the palm of your hand. Wrap the two corners that stick out around your finger to create a ring. Pull the ring off of your finger and place on a floured plate. Do this until you have no dough left.

9. Bring a large pan of salted water to the boil. Tip in the ravioli and boil for 2-3 min or until the tortellini float up the surface.

10. Drain and serve with a drizzle of olive oil and a few shavings of parmesan cheese on top.

Spicy pork noodles

Tonight I found myself with a piece of pork, some noodles and about a ton of button mushrooms. I decided to make a noodle stir fry. It turned out great, but be aware of the chilli bean sauce as it's super hot.

Spicy pork noodles
Serves 1

100 g ground pork
1 pack (60 g) uncooked egg noodles
4 button mushrooms, cut into 4
1 small red onion, sliced finely
1 spring onion

Sauce:
1 tbsp hoisin sauce
½ tsp chili bean sauce
½ tsp soy sauce
1 tsp sugar
75 ml water

1. Cook the noodles according to the instructions on the packet.

2. Mix all the ingredients for the sauce in a small bowl. Set aside.

3. Heat a wok, when hot drizzle in some oil and fry the onions for about 30 sek. Stir in the pork and allow to brown (about 5 min). After about 3 min, add the mushrooms to the wok.

4. Stir in the sauce, and add in the noodles. Wok until the noodles are hot.

5. Serve with a drizzle of toasted sesame on top.

Thursday 24 June 2010

Roasted Chickpeas

Last Friday we arranged a farewell-/birthday for friends who are leaving to go back to Germany this summer after a year in Norway working as volunteers at our church.

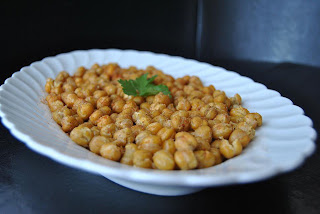
A few days before the party I stumbled across a recipe for "ROASTED CHICKPEAS WITH GARLIC, CUMIN AND PAPRIKA" at The Perfect Pantry. I didn't want to just serve the girls potato chips so decided to make the chickpeas.

I also made a pavlova, which was tasty, but the girls liked the chickpeas better I think. (Correction: Hannah LOVED the cake but "you can't eat too much of such a cake"). I had to give most of the cake away the next day but I didn't have a single chickpeas left by the end of the evening.

Michaela turned 20

Roasted chickpeas with garlic, cumin and paprika
Serves about 6
Adapted from The Perfect Pantry

1 can (400 g) chickpeas
1 tbsp olive oil
2 garlic cloves, grated
3/4 tsp ground sweet paprika
3/4 tsp ground cumin
salt
pepper

Set the oven to 220C.

1. Drain and rinse the chickpeas. Dry them off on kitchen paper. Place then in a bowl, add the olive and garlic to the bowl and shake to ensure that all peas are covered.

2. Spread the chickpeas on a baking tray lined with parchment paper. Roast the chickpeas for about 20 minutes, shaking the tray every few minutes so that the peas are roasted evenly.

3. While the chickpeas are roasting, line a plate with kitchen paper. Place the roasted chickpeas on the kitchen paper to drain. While still warm, sprinkle over the rest of the spices. Transfer the chickpeas to a serving plate or allow them to cool down before storing them in a airtight container.

Sorry Doro, but that's the only photo I have of the almost empty plate!

Thursday 17 June 2010

Fish & Prawn Gratin

I was lucky enough to grown up in a little town in Bohuslän and we always had access to the best and freshest fish, and I remember eating prawns that had been caught that very same morning. It was like eating a little piece of heaven!

This dish reminds me of where I grew up - the Swedish west coast; fish and prawns in a creamy dill sauce is about as close as you get to being a Bohuslänning (a person from the province of Bohuslän) without actually being from Bohuslän.

Fish & Prawn Gratin
Serves 4
Adapted from Tasteline.com

400 g fish, I used Pollock
1 ½ tsp salt
½ tsp white pepper
1 tsp lemon infused black pepper
1/4 leek, chopped
1 dl peeled prawns
1 dl blue mussel meat (optional)
2 ½ dl cooking cream
½ dl chopped dill

Set the oven to 225°C.

1. Start by seasoning the fish with the salt and pepper, and then place the fish in a lightly greased oven proof dish.

2. Mix the cooking cream with the leeks, the prawns, the mussels and the dill. Pour the mixture over the fish.

3. Place in the oven for 15-20 minutes.

Garnish with a wedge of lemon and some fresh dill sprigs.

Serve with rice or riced potatoes.

Friday 11 June 2010

Hawaij spice mix

(Photo to be added shortly)

Hawaij spice mix

Yields 3/4 cup
Adopted from The Chef Maven

6 tbsp whole black pepper corns
3 tbsp whole cumin seeds
2 tbsp coriander seeds
1 tbsp green cardamom pods
1 tsp whole cloves
3 tbsp ground turmeric

1. Place all the spices, except for the turmeric, in a dry skillet over medium heat, stirring often to keep the spices from burning.
2. Heat the spices for a good 5 minutes, then transfer the spices to a plate to cool.
3. Take the cool spices and grind them using a spice grinder, or in an electric coffee grinder.

Note: Please don't use your everyday coffee grinder as the spices will make your coffee taste horrible.

Hatsulim Mamulae

Being not Jewish, this dish introduced me to Kosher cooking. Before googling kosher cooking, I couldn't tell you what differed kosher from "normal" cooking, but reading up about it made me think that my dish was anything but kosher while being kosher. I did not follow the rule of using utensils that had not been in contact with non-kosher foods, the ground beef I used was most certainly not slaughtered in accordance to kosher rules and I know I have used the pots and pans to cook pork.

Now that I know more about kosher cooking, I feel really bad about not following the rules. I feel like a bad Jew, without being Jewish. Does that make sense? I guess it's my inner foodie coming out, and this foodie's respect for different food cultures. But unfortunately, what's done is done. And I wasn't about to go out and invest in a whole new set of pots, pans and utensils.

Even though I didn't have a proper recipe, I just had the scribbles I made while watching Planet Food: Israel and Palestine where they cooked the dish, I set out to give it a try. With no exact measurements and the episode on pause/play on the TV I managed to create a lovely dish. It wasn't as spicy as I had hoped it would be, but this can easily be fixed next time I make the dish by simply adding more spices!

By the way, you might be wondering what this dish is called in terms you might understand. I don't have the direct translation, did I say I'm not Jewish?, but it's something along the lines of "Eggplant stuffed with meat in spicy tomato sauce"

The recipe calls for simple ingredients and does not require you to be a master-chef. However, if you do not happen to live in a place with easy access to the Hawaij spice mix you will have to make it yourself. I made it myself, I wouldn't even know where to look for it here...

Hatsulim Mamulae
Serves 4

1 medium-large eggplant
400 g ground beef, kosher or non-kosher depending on your preference
1 small chopped onion
2 cloves chopped garlic
salt
ground pepper
2 egg
bread crumbs
seasoned flour
vegetable oil

1 medium onion
2-3 cloves garlic
2 tsp sweet paprika
1-2 tsp Hawaij spice mix
1 red bell pepper
1 bay leaf
2 medium chopped tomatoes
1 tbsp tomato puree

Set the oven to 220C.

1. Start off by making the meat stuffing. In a bowl, place ground beef, chopped onion, chopped garlic, salt, pepper, one egg and a good handful of breadcrumbs. Mix gently but well. Set aside.

2. Cut the eggplant into 3 cm thick disks. Then, take each disk and cut as if you were cutting the disk in half to create 2 disks. But instead of cutting all the way through, cut as if you were cutting a sandwich, so that the two pieces are still connected at the bottom.

3. Roll the meat filling into golf ball size balls and stuff each eggplant sandwich with a meatball. Press down on the eggplant sandwish, and mould the meat so that it fits snuggly inside the eggplant.

4. Once you have done step #3 with all the eggplant, roll the eggplant sandwiches in the seasoned flour (flour+salt+pepper), then in the egg (which you have lightly whisked in a bowl), and last but not least you roll the sandwiches in the bread crumbs.

5. Heat the oil in a skillet and fry the eggplants until golden brown and crispy on the outside. The meat should still be mostly raw. When golden and crispy, remove from heat and place in oven proof dish.

6. While the eggplants and browning up in the skillet, make the sauce.

7. In a saucepan, fry the onion, garlic, sweet paprika and Hawaij spice mix in a little bit of oil until the entire kitchen is filled with the most wonderful smell, about 3-5 minutes.

8. Add the rest of the ingredients and allow to reduce for 5 minutes. Add in the tomato puree and about 1 to 1 ½ dl of water and bring to the boil. At this stage taste the sauce and add more spices if needed.

9. Pour the sauce over the eggplants and place in the pre-heated oven. Bake for 45 minutes. If the top starts to burn, cover with aluminium foil.

10. Serve with rice.

Tuesday 8 June 2010

Ethiopian food

I'm going to learn how to cook Ethiopian food tomorrow, and I'm so excited!

My Norwegian friend Ingeborg spent part of her childhood in Ethiopia but for some unknown reason she never learned how to cook proper Ethiopian food. I was appalled at this, and urged her to learn to cook a dish or two when she went to visit her parents, who still live and work in Ethiopia, a few weeks ago.

Tomorrow she's coming around to teach me to cook Ethiopian food. I am not quite sure we're cooking, but it's got something to do with chicken and some spice that can kill you- or something along those lines.

So, provided I'm still alive after tomorrow's cooking class I'm planing on uploading the recipe and photos this weekend.

To be continued (hopefully)...

Ok, so this didn't happen. My friend said she didn't feel inspired and her motivation for cooking was zero... so, maybe I get to experience some real Ethiopian cooking when she returns after the summer...

To be continued (for sure this time)...

Monday 7 June 2010

Crispy Chicken Bits

A while back I bought a packet of Santa Maria's Crispy Chicken Bites Spice Mix.
It's been sitting the cupboard ever seen, almost forgotten. But the other day I decided to try it out. I don't know why I bought the packet at the store that day, but I'm glad I did. Not so much because the chicken bits turned out too-tasty-to-be-true but because it made me think I could make it myself- with a better, tastier, result.

I must admit I haven't tried it yet, but I instructed my friend Susanne on how to make them, and she tried them out on Saturday. She was delighted with the way they turned out. I can't wait to make them myself, from scratch this time and not from a packet.

Photo by Susanne Lindberg

Crispy Chicken Bits
Serves 4

150 g cheese flavoured nacho chips
15 g extra spicy taco seasoning mix, or to taste
3 large chicken breasts

1. Start off by crushing the nacho chips. Keep them in the bag when crushing them, but be sure to open the bag a little bit so that air can escape, or else the bag'll explode once you start hitting it with your weapon of choice- I used a rolling pin.

2. Mix in the taco seasoning mix.

3. Cut the chicken into thin strips or bite-size pieces. If the chicken bites are dry, dip them in a little bit of oil before coating each piece with the nacho chips mix.

4. Heat some oil in a frying pan and fry until the chicken juices run clear and the crust is golden brown and crispy. You can also bake the chicken in a 220C oven.

5. Serve the chicken bites with soft tortilla bread and an assortment of toppings; such as bell peppers, lettuce, grated cheese, sliced onion, sweet corn and/or guacamole or any other sauce of your choice.

Thanks Susanne for being my guinea pig for this recipe. You're a star!