Showing posts with label Finger food. Show all posts

Tuesday, 31 August 2010

Zucchini fritters


Tonight's dinner- Zucchini fritters

Zucchini fritters
Makes 4

1 rather large zucchini, about 30 cm long
½ red chilli, de-seeded and finely chopped
2 spring onions, finely chopped
1 egg, beaten
½-1 dl flour
salt and pepper

1. Grate the zucchini in the coarse side and place the grated zucchini in a bowl. Sprinkle with some salt, mix and set to rest for about 20 minutes. After 20 minutes, place the zucchini in a colander and press down to squeeze out any zucchini juices.

2. Place the zucchini back in the bowl and mix with the rest of the ingredients. The fritter "batter" should be quite loose.

3. Heat some oil in a frying pan and fry as large or small fritters as you want. Flip over when the bottom has turned golden and crisp.

Serve with a dollop of yoghurt and your favourite topping, such as sliced chicken, bacon, prawns or eat them as they are.

Tuesday, 13 July 2010

Grilled marinated shrimp

Prawns + garlic + lemon juice + olive oil + grill= drop dead combination!

I can't believe I didn't come up with this recipe myself, I guess I love the plain ol' prawn too much. But from now on I am going to be making this grilled version of my beloved prawn whenever the weather allows me to fire up my grill.

We made this recipe this past weekend when my friend Hanna and her boyfriend Jamal came to visit. Hanna actually came across the recipe while looking through one of my many food magazines. We served the shrimps as a starter for our Saturday dinner, chicken grilled whole on the BBQ with a side of oven roasted potatoes and toum, my new favourite sauce. The recipe for toum will be added shortly.

Grilled marinated shrimps
Serves 4
Adapted from Maison Mat & Vin 3/2010

0,5 dl olive oil
3 cloves garlic, grated
2 tbsp lemon juice
1 tsp salt
600 g pre-cooked shrimp with the shell on
you can also use raw shrimps

1. Combine the olive oil, the grated garlic, the lemon juice and the salt in a bowl.

2. Place the shrimps in a ziploc bag, and pour in the marinade. Close the bag and massage it gently to ensure that the marinade covers all the shrimps. Place the bag in the fridge for at least 30 minutes.

3. Thread the shrimps onto wooden or steel skewers and grill the shrimps until the shell turns a little white or golden brown. It will take a little longer if you are using raw shrimps.

Serve with mayo, warm baguettes and a glass of white wine.

Wednesday, 30 June 2010

Lemony chicken wings

I saw this recipe a while back and I immediately knew I had to try it. I have been enjoying chicken wings quite a lot lately but have only ever made Spicy, honey glazed chicken wings and it felt like I needed a change of scenery, if you will.

And boy, the recipe for Lemony chicken wings was just the change of scenery that I needed. They were just delicious, just incredibly juicy and lemony!

YOU need to make these, YOU need to try them for yourself. They're really that good, I promise!


Lemony chicken wings
Serves 6
Adopted from Leila på landet

1 kg chicken wings
2 cloves garlic, grated
2,5 cm (1 inch) ginger, grated
2-3 lemongrass stalks
the zest from 2 lemons
3 tbsp tomato purée
3 tbsp Japanese soy sauce
2 tbsp light muscovado sugar
1 tbsp sesame seed oil

1. Place the grated garlic and ginger in a bowl.

2. Peel off the outer layers of the lemongrass, discard. Smash the lemongrass with the back of your knife. Finely chop the white part of the lemongrass and discard the more green and woody part. Add the chopped lemongrass to the bowl with ginger and garlic.

3. Add the rest of the ingredients and stir to mix.

4. Place the chicken wings in a large Ziploc bag or in a 5 litre plastic bag (you might want to put one bag into another bag to ensure that if the bag rips the marinade won't cause a mess). Pour the marinade into the bag with the chicken. Close the bag, pressing out as much air as you can while you close the bag. Massage the chicken wings to ensure each wing is coated with the marinade. Place in the fridge to marinade, preferably overnight.

5. Fire up the barbecue and grill the marinated chicken wings until done. To check if the wings are done, pierce the thickest part of the wing with a knife, if the juices run clear, then the wing is done. If the juice is a little bloody, keep grilling the wing until the juice runs clear. If you use small wings, like I did, you can place a double layer of aluminium foil on top of the grid/grate to keep the wings from falling onto the charcoal.

6. Serve as finger food at a party or as part of a BBQ-meal.

Enjoy!

Thursday, 24 June 2010

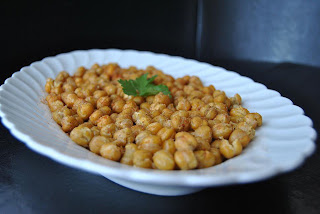
Roasted Chickpeas

Last Friday we arranged a farewell-/birthday for friends who are leaving to go back to Germany this summer after a year in Norway working as volunteers at our church.

A few days before the party I stumbled across a recipe for "ROASTED CHICKPEAS WITH GARLIC, CUMIN AND PAPRIKA" at The Perfect Pantry. I didn't want to just serve the girls potato chips so decided to make the chickpeas.

I also made a pavlova, which was tasty, but the girls liked the chickpeas better I think. (Correction: Hannah LOVED the cake but "you can't eat too much of such a cake"). I had to give most of the cake away the next day but I didn't have a single chickpeas left by the end of the evening.

Michaela turned 20

Roasted chickpeas with garlic, cumin and paprika
Serves about 6
Adapted from The Perfect Pantry

1 can (400 g) chickpeas
1 tbsp olive oil
2 garlic cloves, grated
3/4 tsp ground sweet paprika
3/4 tsp ground cumin
salt
pepper

Set the oven to 220C.

1. Drain and rinse the chickpeas. Dry them off on kitchen paper. Place then in a bowl, add the olive and garlic to the bowl and shake to ensure that all peas are covered.

2. Spread the chickpeas on a baking tray lined with parchment paper. Roast the chickpeas for about 20 minutes, shaking the tray every few minutes so that the peas are roasted evenly.

3. While the chickpeas are roasting, line a plate with kitchen paper. Place the roasted chickpeas on the kitchen paper to drain. While still warm, sprinkle over the rest of the spices. Transfer the chickpeas to a serving plate or allow them to cool down before storing them in a airtight container.

Sorry Doro, but that's the only photo I have of the almost empty plate!

Monday, 7 June 2010

Crispy Chicken Bits

A while back I bought a packet of Santa Maria's Crispy Chicken Bites Spice Mix.
It's been sitting the cupboard ever seen, almost forgotten. But the other day I decided to try it out. I don't know why I bought the packet at the store that day, but I'm glad I did. Not so much because the chicken bits turned out too-tasty-to-be-true but because it made me think I could make it myself- with a better, tastier, result.

I must admit I haven't tried it yet, but I instructed my friend Susanne on how to make them, and she tried them out on Saturday. She was delighted with the way they turned out. I can't wait to make them myself, from scratch this time and not from a packet.

Photo by Susanne Lindberg

Crispy Chicken Bits
Serves 4

150 g cheese flavoured nacho chips
15 g extra spicy taco seasoning mix, or to taste
3 large chicken breasts

1. Start off by crushing the nacho chips. Keep them in the bag when crushing them, but be sure to open the bag a little bit so that air can escape, or else the bag'll explode once you start hitting it with your weapon of choice- I used a rolling pin.

2. Mix in the taco seasoning mix.

3. Cut the chicken into thin strips or bite-size pieces. If the chicken bites are dry, dip them in a little bit of oil before coating each piece with the nacho chips mix.

4. Heat some oil in a frying pan and fry until the chicken juices run clear and the crust is golden brown and crispy. You can also bake the chicken in a 220C oven.

5. Serve the chicken bites with soft tortilla bread and an assortment of toppings; such as bell peppers, lettuce, grated cheese, sliced onion, sweet corn and/or guacamole or any other sauce of your choice.

Thanks Susanne for being my guinea pig for this recipe. You're a star!

Saturday, 8 May 2010

Falafel

I have been meaning to post this recipe for falafel for a really long time now, but for some reason I've been stalling it.

I think remember the first time I had falafel, it was in London in 2003. I don't exactly remember them as an "explosion of Oriental flavours in my mouth", it was more like "hmm... these were pretty good". I think they were bought at Marks & Spencer, which might have been the reason why there weren't all that delicious. But obviously, they were delicious enough for me to want to try falafel again, so over the years I've had the odd falafel.

However, it wasn't until fairly recently, say about a year ago, that I realised I could make them at home. I had always envisioned the process time-consuming and tedious. This was until I came across an easy recipe for falafel-"burgers" at BBC GoodFood.

I know, a falafel-burger sounds pretty horrid, but the recipe is great for making small patties to stuff in toasted pita-breads and serves with side dished such as tabbouleh, crisp salad, thinly sliced red onions and a minty yoghurt sauce to drizzle on top. It sounds pretty delicious, right?!
The recipe calls for canned chickpeas, and after having tried both the canned sort and the dried sort that you have to soak in water for at least 12 hours, I can definitely say I prefer the canned peas for this particular recipe. I couldn't get the dried peas soft enough, and deep-frying the falafel didn't help to soften them one bit...

Falafel
Serves 4
Adapted from BBC GoodFood

400 g can chickpeas, drained
1-2 garlic cloves
1 handful parsley
1 tsp cumin powder
1 tsp coriander powder
½ tsp harissa or chilli powder
2 tbsp flour
2 tbsp oil

To serve
pita breads, chopped tomatoes, tabbouleh, red onions and yoghurt sauce

1. In a food processor, mix the chickpeas, garlic, parsley and spices plus the flour to a rather smooth mix. You can leave it chunkier if you prefer more texture.

2. Heat the oil in a frying pan and fry small-ish balls of the chickpea mixture until heated through, golden brown and crisp on the outside.

Sunday, 28 March 2010

Mexican egg rolls

I was invited to attend "Den store gavefesten" at Ibsenhuset last Tuesday. It's a big concert featuring local talents, not only singing but also line dancing, football skills and agility, sponsored by one of the local banks here in Skien. There was a great orchestra entertaining us in the foyer and we were served an assortment of finger foods, Spanish meatballs, little mini-quiches and tasty little Mexican egg rolls.

I ate quite a few of these Mexican egg rolls, hello it was free and I was hungry! and quite enjoyed myself. But I couldn't help but think of how I could improve on the flavour.

Here's my first attempt

Mexican egg rolls
Makes lots

400 g ground beef
1 yellow onion, chopped
1 packet taco seasoning
1 dl taco salsa
100 g sweet corn
2 tbsp chopped jalapeños
1 dl water
1 packet spring roll wrappers
oil for deep frying

1. Start by browning the beef and the onion in a frying pan. Pour in the rest of the ingredients and fry for 10 minutes.

2. Take out a spring roll wrapper, if using the large variety cut it in half. Place about 1 tbsp of the taco beef at one end of the wrapper. Fold in the corners and roll into a finger-looking thing. Do this until you either run out of filling or wrappers.

3. Heat the oil and deep fry until golden and crispy.

4. Serve with an assortment of dipping sauces.